Method 1: Level Beginner
The easiest most simplest way to ssh into your raspberry pi is through the pi itself.
For this you will require a HDMI or RCA compatible Monitor / LCD or LED Screen / TV.
Along with a USB Keyboard (optional USB mouse). Of course as usual your Raspberry Pi will require a power adapter to power it and a SD card with a OS (Raspbian/NOOBS) burnt onto it.
Simply connect the Monitor / LCD or LED Screen / TV to either the RCA or HDMI ports present on the raspberry pi and connect the SD and power adapter and power it on.
After a couple of boot up messages you should see the following line which mean you are now into the shell of the raspberry pi, and the pi will accept further shell commands after you enter a valid username and password.

Method 2: Level Moderate user
So now that you’ve used the pi in this config, u realize that the pi is no longer portable. Why?, cause you’ll always need a HDMI/RCA capable screen to view and work on the pi.
DO NOT PANIC!
Solution: instead of a monitor now you’ll need your own laptop and a router or a modem with at least 2 LAN ports and preferably wifi.
Next we connect a LAN cable to the pi and to the router/modem and then another LAN cable from the second port of your router/modem to your pc. If your router/modem has wifi then just connect your laptop via wifi.
PS if your router has a WAN port along with LAN port DO NOT! i repeat DO NOT! connect to the WAN port of the router.
Now if your Pi is properly connected to the router/modem all Led lights below the PWR Light of the Pi should light up.

Also your pc should show lan / wifi access to your router/modem.
Thus we have created a local network involving your laptop and your pi.

Now to find your pi’s IP address on this local network. Before we do this we will need download two application software on your laptop.
The first one is called Advanced IP Scanner.
Download this software from the link above and install it on your system.
When the software starts correctly the following window should pop-up on your screen.

Sometimes we may not know what IP’s (addresses) the router or modem is giving out to the devices connected to it. For this IP scanner gives a simple solution of just clicking a Button encircled above within the software called IP.
If your system has got a valid IP the address bar will now contain a range of address within which the router assigns IPs.
In the image above it is (192.168.1.1 – 192.168.1.255). This simply says that the router generally has its own IP address at 192.168.1.1 the first available address and your system or any other device connected to the same router will have an IP address of 192.168.1.x where x= any number between 2 and 255.
After this is done click on SCAN, to search for all available systems present on the local network you just set up. The software will list out all systems along with their IP addresses when this is done.

Ignore the fact that my Raspberry Pi has got the name as KRISHNA-WAIO(few bugs in IP scanner), but as you can see it clearly says in the manufacturer tab that it is from Raspberry PI Foundation nad has an IP address of 192.168.1.101
This IP address may vary for you and so may the name, but the manufacturer will always show as Raspberry PI Foundation.
Note down this IP which your Pi has got from the router and then Download(required only for Windows users) a software named PuTTY.
Depending on what you’ve downloaded you may have to install PuTTY or just Click on the Application to run it.

As seen in the image above all you have to do next is enter your Pi’s IP address and click on open. You are now ready to SSH into your Raspberry Pi.
After typing in your login name and password you will see the following screen.

Your Pi will now accept Shell commands but you will not be able to use startx command to view Pi desktop.
Method 3: Level Advanced (Less Hardware Requirements)
Now the first method suits best for a single user at home. With requirements of compatible screen and USB keyboard.
The second method suits best for multiple user at home or anyplace which has plug points. With requirements of a router/modem with LAN ports and WIFI and LAN cables.
This method requires minimum hardware. ONE LAN CABLE.
Wait before you get all excited PLEASE NOTE you’ll need to configure your Pi using either Method 1 o Method 2.
So please ssh into your Pi and type the following in shell command line.
sudo nano /etc/network/interfaces

The nano editor will open the following file

We have to edit this file.
First the line that says “iface eth0 inet dhcp” should be changed to “iface eth0 inet static”
Next, after this line add the following lines after leaving a space from the leftmost column.(make sure all the following lines of code have an equal space from the leftmost column, this process is called code indentation)
address 192.168.1.10
netmask 255.255.255.0
gateway 192.168.1.1
Your modified file should look like this.

DO NOT worry if your file below the “gateway” address doesn’t look same as the pic above, that is the configuration for wifi and will not be covered in this post
Save this config and reboot your Pi using the following command
sudo reboot

Now that your Raspberry PI is set up it may or may not work with your router/modem (depending on whether 192.168.1.x is the IP range your router/modem works in or not).
That competes half of this method. The second half is to configure your System(Laptop or PC).
Start by going to your network settings and then your network adapter settings page.
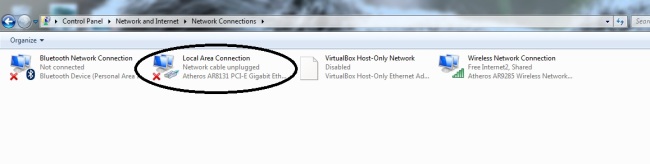
Right click on your Ehternet adapter(this post doesn’t cover any aspect, if your laptop doesn’t have an ethernet port or if your drivers for it are not installed) and click on properties.
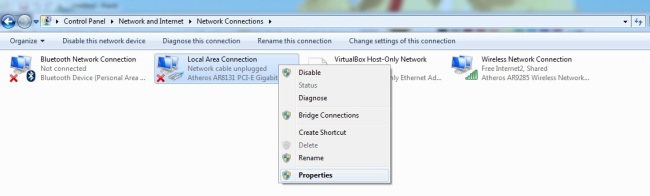
Doing so should open the following window.
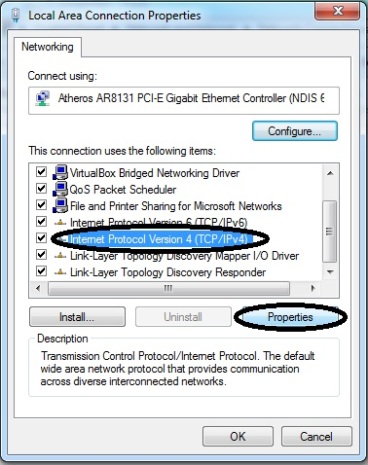
First select Internet Protocol Version 4(TCP/IPV4), and click on Properties.Doing so should open the following window.

If you have some settings done already here save them.(I’m guessing if you do you have prior experience in these steps).
Otherwise click on “Use the following IP address:” and enter the following

you can choose your own ip address i.e. 192.168.1.50 can be anything between 2 to 255 but not the same as the you previously set for your Pi.
BUT!!! make sure your netmask and gateway are the same as shown above and as same as the ones you had previously set on PI.
After you save and close both windows you are now ready to ssh into your Pi.
Just connect a LAN cable between your system and your pi. Then open PuTTY on your system and type in the address you assigned for Pi and you are GOOD TO GO!!! enjoying experimenting with this wonderful device.
This post was written for Inventrom by Dattaprasad Naik. Datta has been working with Inventrom since 2013 and leads Learn, the department involved in training and workshops. Follow Datta on twitter via @datta_TECH
At Inventrom we have, to our credit, an experience of four years in conducting workshops for engineering students and working professionals alike. We have successfully conducted workshops for our corporate clients such as TCS (Tata Consultancy Services), Chowgules, NETZSCH, PSL(Persistent Systems Ltd.) etc. We have also conducted workshops at conferences such as Nullcon, VLSI Society of India Symposium, BARCamp Goa etc. We always love to teach engineering students and hence in last one year we have trained more than 1000 engineering students. We have conducted workshops in institutions such as IIT Kanpur, IIT Roorkee, BITS Pilani, BITS Goa, VIT Vellore and many other prestigious engineering colleges of India and have continuously received overwhelmingly positive response from the students, hobbyists and researchers alike by means of feedback and testimonials.
To know more about our workshop on Raspberry Pi and to organise the same at your institute visit Invent-O-Pi mail to contactus@inventrom.com or call Pranav on (+91)7875238094


 3) This one is for dyslexic like me


